Welcome to CWireGuide.com! This website explains the purpose of your HVAC system’s c-wire and options to consider if you don’t have a c-wire and want to have a WiFi enabled smart thermostat.
This website is intended for North American readers.

The C-wire, or common wire, is a critical component of modern HVAC (Heating, Ventilation, and Air Conditioning) systems. While it might seem like just a simple wire, its purpose is fundamental to the operation of your HVAC system, particularly when it comes to newer, energy-efficient, and smart thermostat installations. In this article, we will explain the purpose of the C-wire and explain why the C-wire has become an essential part of today’s HVAC setups.
1. Power Supply
At its core, the C-wire serves as a continuous power supply line for your thermostat. Most thermostats, especially digital and smart ones, require a stable power source to function correctly. They use this power to run the thermostat’s display, circuitry, and, in the case of smart thermostats, Wi-Fi connectivity. Unlike other wires like R (power), W (heating), Y (cooling), and G (fan), which carry signals to activate specific functions in your HVAC system, the C-wire’s sole purpose is to provide constant 24-volt power to the thermostat.
2. Battery Backup
While the C-wire primarily provides power, it also has a secondary function as a battery charger. Many thermostats have internal batteries that help retain settings and maintain operation during power outages. The C-wire ensures that these batteries remain charged so that your thermostat can continue to function even when the power is off.
3. System Stability
HVAC systems are complex and require precise control to operate efficiently. Without a C-wire, your thermostat might have to rely on power-stealing methods, such as drawing power from the R-wire intermittently. This can lead to erratic behavior and system instability. With a dedicated C-wire, your thermostat always has a stable power source, ensuring accurate temperature control and a smoother overall operation of your HVAC system.
4. Compatibility with Smart Thermostats
The growing popularity of smart thermostats, like the Nest Learning Thermostat and Ecobee, has made the C-wire even more essential. These smart devices have advanced features including Wi-Fi connectivity, learning algorithms, and remote control capabilities. These features demand a constant power supply, which the C-wire provides. Without a C-wire, you may encounter compatibility issues or reduced functionality with these high-tech thermostats.
5. Energy Efficiency
Efficiency is a significant concern in today’s world, both for cost savings and environmental reasons. The C-wire plays a role in this by enabling precise temperature control. When your thermostat has a stable power source, it can accurately maintain the desired temperature, preventing temperature swings. This, in turn, ensures that your HVAC system operates efficiently, reducing energy consumption and lowering your utility bills.
6. Prevents Furnace Short Cycling
Furnace short cycling occurs when the heating system turns on and off rapidly, often due to a thermostat’s erratic behavior. This not only reduces the lifespan of your HVAC equipment but also consumes more energy. A C-wire helps prevent short cycling by providing consistent power to the thermostat, allowing it to maintain a stable temperature without causing unnecessary system cycling.
7. Facilitates Easy Installation
When installing a new thermostat, especially a smart one, having a C-wire simplifies the process. Without it, you might need to hire a professional to install an external power adapter or make wiring modifications to your HVAC system. With a C-wire already in place, installation is typically straightforward, making it a DIY-friendly option for many homeowners.
In summary, the C-wire serves a vital purpose in your HVAC system by providing a stable power supply to your thermostat. It ensures the smooth operation of your heating and cooling system, prevents short cycling, enhances energy efficiency, and is especially crucial for the compatibility and functionality of modern smart thermostats. While older HVAC setups might not have utilized the C-wire, its importance has grown with advancements in technology, making it an essential component in today’s energy-efficient and connected homes. If you’re considering upgrading your thermostat or installing a new one, ensuring you have a C-wire will be a wise decision to fully utilize the capabilities of modern HVAC control systems.
Do I have a C-wire?
Determining whether your thermostat has a C-wire (common wire) can be a bit tricky because it depends on the specific thermostat model and how it’s connected to your HVAC system. Here are some steps to help you find out if your thermostat has a C-wire:
- Check the Thermostat’s Manual: The first step is to consult the user manual or installation guide that came with your thermostat. Look for information about wiring and whether the thermostat requires a C-wire or has one.
- Inspect the Thermostat Terminals: Remove the thermostat’s cover to access the wiring terminals. You’ll typically find terminals labeled with letters, such as R, W, Y, G, and C. If you see a wire connected to the C terminal, then your thermostat has a C-wire. It’s often labeled as “C” or “Common.”
- Check the Wiring at the HVAC System: If you’re not sure about the C-wire at the thermostat end, you can also check the wiring at your HVAC system’s control board. The C-wire is typically connected to the control board at the HVAC system as well. Look for a wire that is connected to the C terminal on the control board.
- Look for Unused Wires: Sometimes, installers may run an extra wire (often blue) and leave it unused if your thermostat doesn’t require a C-wire. It could be tucked behind the wall or not connected to the thermostat. If you find an unused wire in the thermostat’s wiring bundle, check if it’s labeled as “C” at the other end. If so, you can use it as a C-wire.
- Use a Multimeter: If you’re still uncertain, you can use a multimeter to test the voltage between the R (power) and C terminals at your thermostat. A C-wire should have a voltage of around 24 volts. If you measure this voltage, then you have a C-wire.
- Consult a Professional: If you’re uncomfortable with any of the above steps or if your thermostat wiring appears complicated, it’s a good idea to consult an HVAC technician. They can identify whether you have a C-wire and help with any wiring modifications if necessary.
Remember that not all thermostats require a C-wire, especially older models. However, modern digital and smart thermostats often benefit from having a C-wire to ensure stable power and enable advanced features. If your thermostat doesn’t have a C-wire, but you want to install a newer thermostat that requires one, you may need to run a new wire from your HVAC system’s control board to the thermostat location, or use alternative methods like a power extender kit (commonly used with smart thermostats) to provide the necessary power.
Follow along with the next section to see what’s behind your thermostat.
Identifying your thermostat wires
You could probably live your entire life without thinking about thermostat wires unless you want to upgrade to a smart thermostat, many of which are labeled “C-wire required”.
Identifying and understanding the wires connected to your thermostat is crucial for various reasons, whether you’re replacing your thermostat, troubleshooting HVAC issues, or installing a new smart thermostat. Here’s a step-by-step guide on how to find and identify your thermostat’s wires:
Tools you’ll (probably) need
- Screwdriver: You may need a Phillips or flat-head screwdriver, depending on the type of screws holding your thermostat in place.
- Labels: Sticky labels or masking tape and a pen to label each wire for easy identification.
- Flashlight: To help you see clearly in tight or poorly lit spaces.
Steps to Find and Identify Your Thermostat’s Wires
1. Turn off the power
Safety first! Before doing anything, turn off the power to your HVAC system. You can usually do this by switching off the circuit breaker or removing the fuse that powers your HVAC system. This is crucial to avoid electrical accidents during the process.
2. Remove your current thermostat
If you’re replacing your thermostat, gently remove the old thermostat from the wall. Most thermostats are attached to a mounting plate with screws. Carefully unscrew and detach the thermostat from the plate.
3. Examine the wiring
You’ll find a bundle of wires connected to terminals on the thermostat’s backplate. These wires control various functions of your HVAC system.
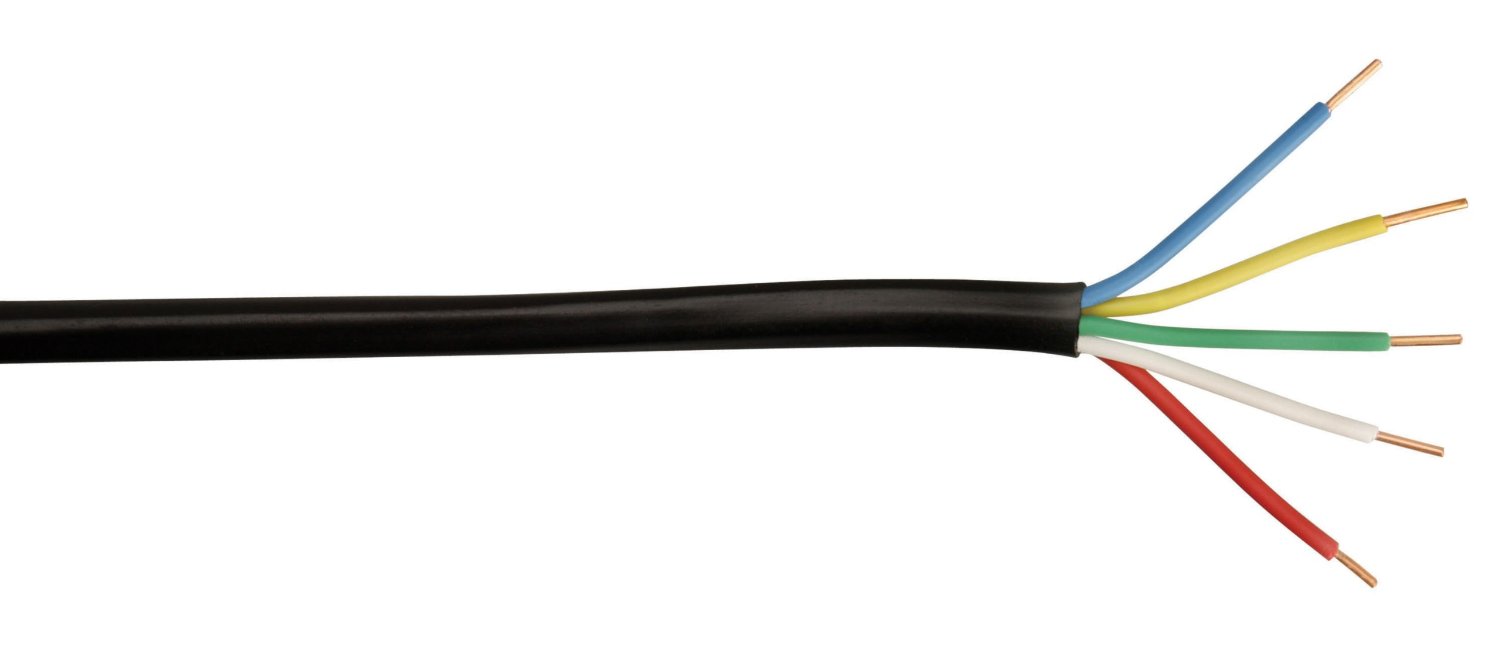
Here are some common wiring scenarios you may find behind your thermostat. Remember – any wire can be used for any purpose! Someone may have been “creative” with your thermostat’s wiring. Nothing in this list is a guarantee.
- 2 wires [red and white]: You probably have a heat-only system.
- 3 wires [red, white, and green]: You probably have a boiler. There is a 24-volt hot wire, a 24-volt common wire, and a white wire.
- 4 wires [red, blue, white, and green]: You probably have a battery-powered thermostat or a digital thermostat hooked up to a heat-only system. The common configuration consists of 24-volt hot (red), 24-volt common (blue), heat (white), and a fan (green).
- 5 wires [red, blue, white, green, and yellow]: You probably have both heat and air conditioning. The wires are usually hooked up like so: red for 24-volt hot, white for heat, yellow for cooling, green for the fan, and blue for common (although the common wire may be a different color).
» See our thermostat wire color guide for more detail on wire colors
Best options for systems without a c-wire
Add an adapter
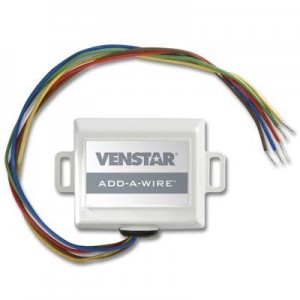
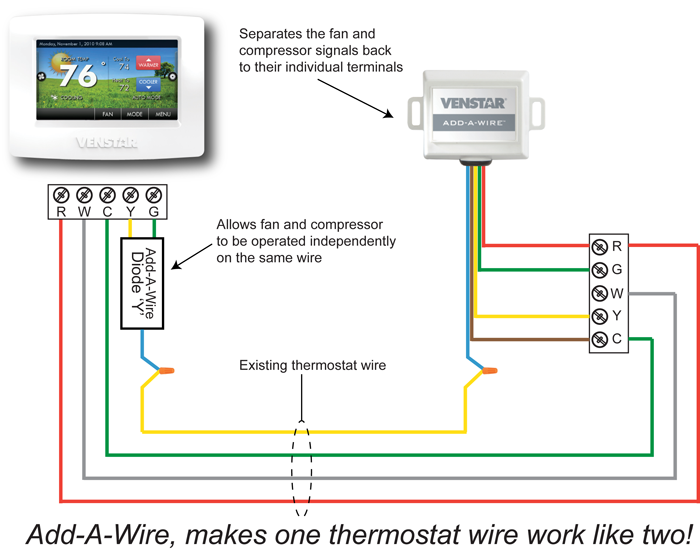
We recommend the Venstar Add-a-Wire adapter, which can make a 4-wire system act like a 5-wire system by combining the signals of two wires onto one.
It sounds complicated but it’s easy to install (easier than running totally new wires, anyway) and is the most frequently recommended and most popular solution to the missing c-wire dilemma. The Venstar Add a Wire unit installs inside (or near) your furnace.
This 5 minute YouTube installation guide gives you a good idea of what to expect, and the diagram below from hvacproblemsolver.com illustrates the final assembly.
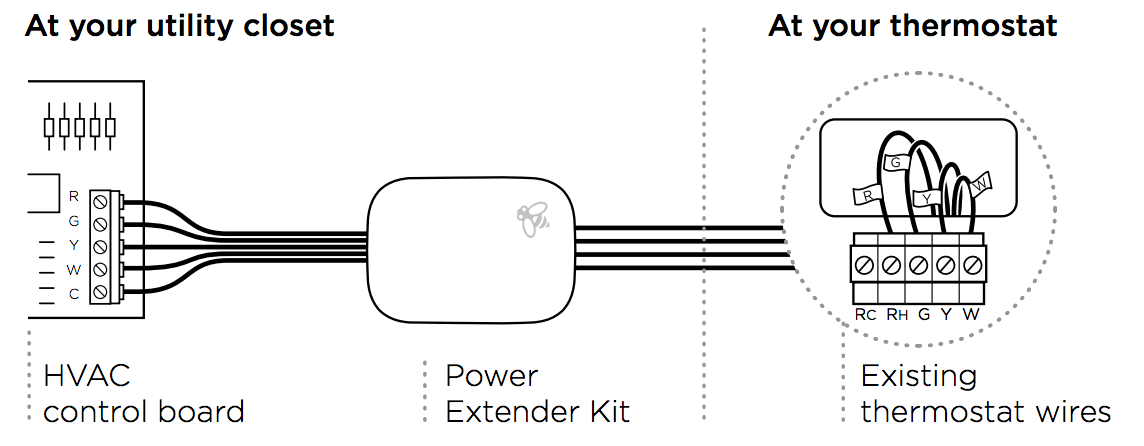
Get an ecobee thermostat + power extender kit
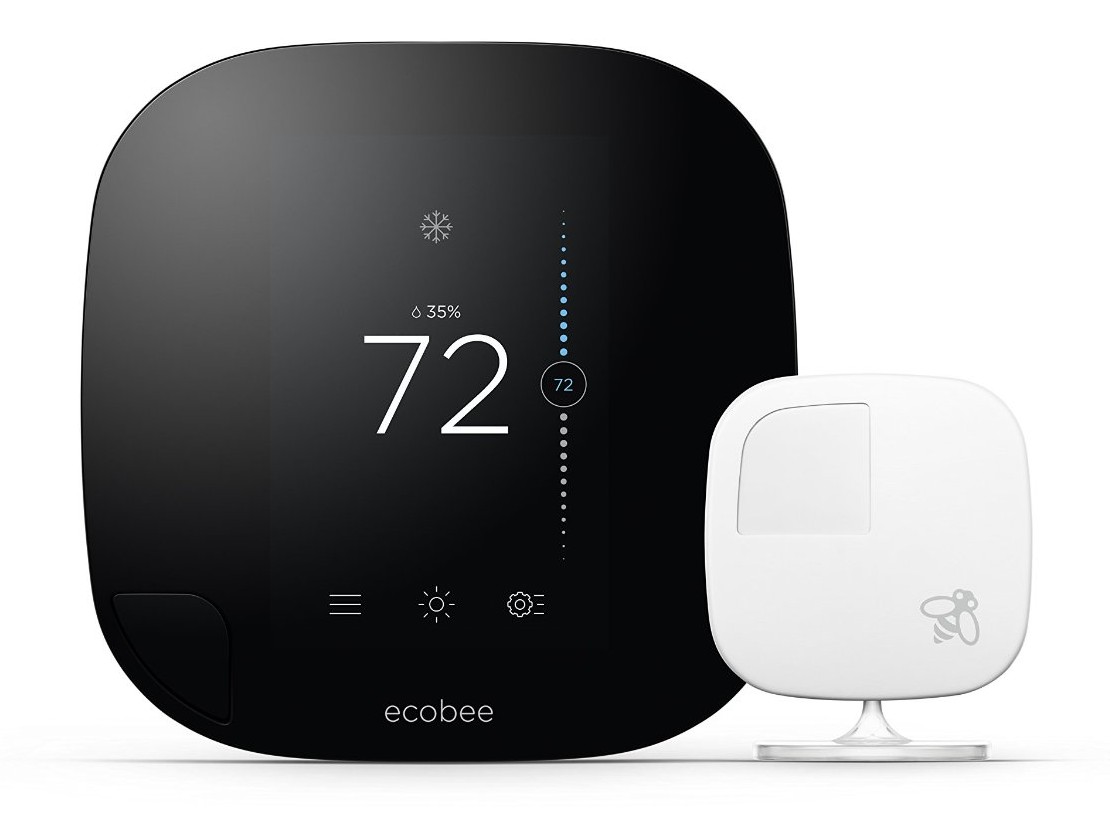
Ecobee’s WiFi smart thermostat, the ecobee3, is one of the best-reviewed smart thermostats of the last two years. See positive ecobee3 reviews here, here, here, and here. One of the reasons it’s so well-liked is because it comes with a power extender kit that gets hooked up inside your furnace to add power-giving goodness to your existing 3-wire or 4-wire setup (either one works).
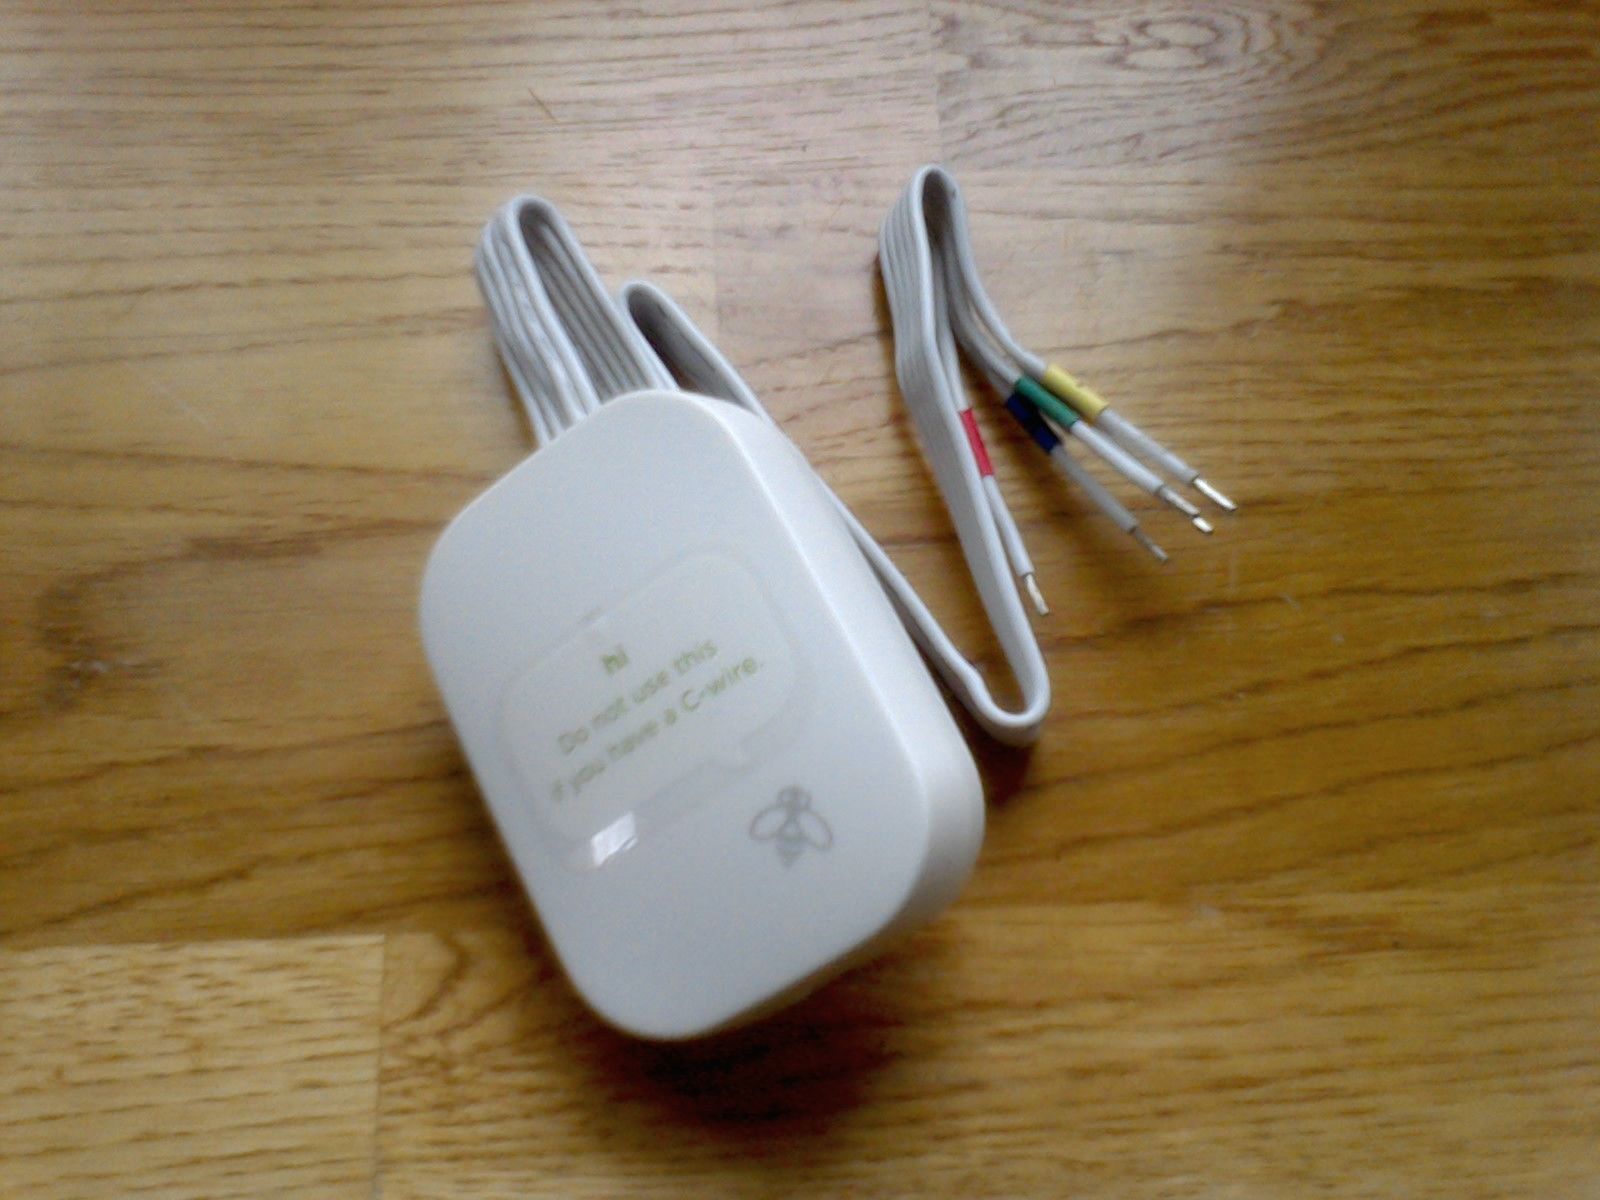
No c-wire needed, and you get a great WiFi enabled thermostat with all the bells and whistles in the process. See Step 3 of ecobee’s official installation instructions to get a better understanding of the PEK setup.
… or an Emerson Sensi smart thermostat

The Emerson Sensi WiFi programmable thermostat is also a top choice because it’s just like the programmable thermostats everyone already knows and loves (digital screen, low power consumption) but with all the goodness of a modern WiFi thermostat. The Emerson’s companion app is great for setting up schedules, overriding existing programming, and monitoring usage.
I have a C-wire, does that change your recommendation?
Surprisingly, no – we’re big fans of the ecobee lineup and encourage you to look into buying an ecobee whether you have a C-wire or not.
Here are some of the smart thermostats that are most popular with our visitors (visitors who, like you, possibly, arrived here because they were looking for thermostats that worked without a C-wire):